
OK Google, How Do I Connect You To The University Network?
I am very proud of my Google Home. My son loves her as she plays him ABC and The Wheel on the Bus everyday. I took every opportunity to show her off to house guests. But that was before I moved to an university accommodation and relinquished the previous residential Internet connection. The university has WIFI coverage in the house, and provides several LAN ports on the wall. I plugged her in, and to my horror discovered that she does not work with WPA2 Enterprise Wifi network. And it’s not just her, other smart TVs aren’t likely to work either. They are not designed for networks with stringent security protection.
Digging around, I found the major different between WPA2 Enterprise, commonly found in university and most enterprises that have something to protect, versus WPA2 personal, ones that are built in residential routers, is 802.1X. This is a port-based authentication protocol and works roughly as follows:
-
You plug your machine into the wall LAN port. That port is connected to a switch somewhere. That switch doesn’t let packages through unless the port is authenticated.
-
You enter your assigned credentials, that is sent to an authentication server.
-
The authentication server checks if you are allowed in the network, then replies so to the switch.
-
If the response is positive, you’re connected.

Compared to WPA2 Personal, where you set up a pre-shared key (PSK) and tell everyone who needs it, 802.1X has stronger security. First, it decouples authentication from access: whoever knows PSK can access your home network, but not everyone having accounts in the enterprise system can access the network. Second, revocation is simpler: to revoke one access with PSK you have to change the key and tell everyone else, but with 802.X you simply tell the authentication server.
Your connection to the network is identified and authenticated by the LAN port you’re connecting too, and also by the MAC address of your computer. Without the latter, the port only needs to be authenticated once, then any rouge machine can be plugged in.
The caveat with 802.X is that authentication is done only when a new connection is established. Meaning that if you never logged out (or your LAN cable got unplugged), then you’ll remain connected.
Spoiler alert! This caveat came back to bite me later.
First Try. Failed!
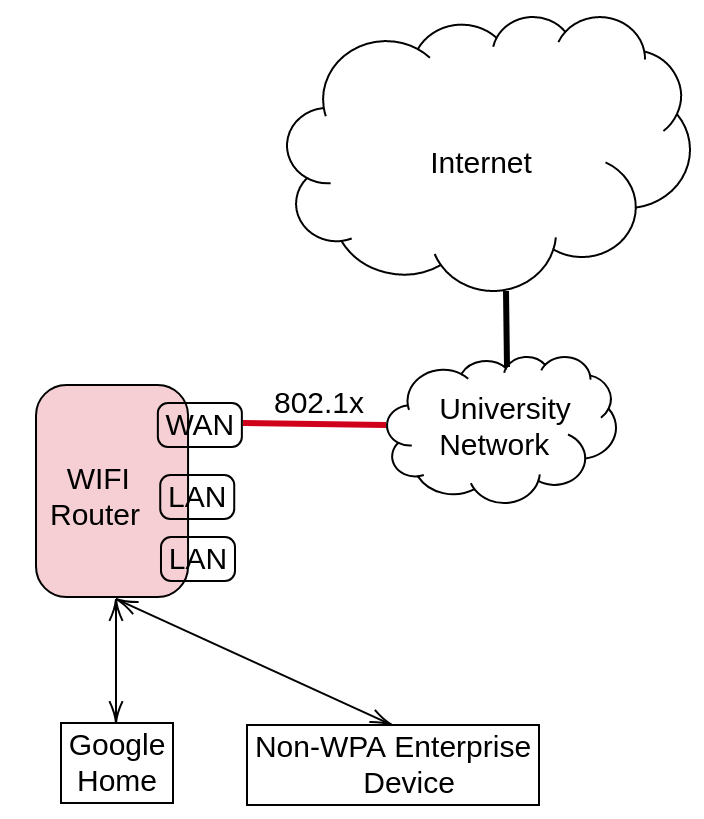
Understanding that GoogleHome needs a WPA-Personal network, I bought a Wifi router. The idea is to set up a WPA2 network like the figure above. Ideally, the router does two things:
-
It connects to the university wired network.
-
It acts as an access point, broadcasting Wifi to the house. Of course it won’t be using WPA2 Enterprise.
Then my GoogleHome can just connect to it. Lo and behold, it doesn’t work.
Turns out that routers (I bought an Asus RT-N12D1 model, not expensive but not so cheap either) are so dumb that they don’t talk 802.1X over the WAN connection.
Cloning doesn’t work
My next step was trying to clone MAC address of the laptop that has been successfully authenticated. My reason is that the authentication is based on (port, MAC) tuple, so if the router has the same as the laptop then it should work. But NO. Once I plug the cable out of the laptop, connection is reset so that the next one (plugged to the router) will again go through 802.1X authentication process. Cloning doesn’t help.
Hacking the router doesn’t work
A colleague then told me to hack the router. That feeling you have when successfully install new firmware on the router, or flashing it, and being able to SSH in, was extremely powerful and addictive. No wonder some people loves working with hardware. But that feeling quickly evaporated and was replaced by frustration.
Many years ago I heard of friends talking about replacing router software with customized operating system. The process seemed a lot of work, and my understanding then was that only a few expensive routers would let you do that. Now though, even the cheapest ones, like D-Links, are capable of running open-source router OS. Looking at the list of devices supported in some of these OS makes you appreciate the effort of the open source community. Unfortunately for my case, none of the popular router OSes works.
-
OpenWRT: does not have (stable) support for Wifi hardware in my router. It means the best I can get is a non-Wifi router connected to the university network. But GoogleHome doesn’t have LAN connection. So this option is off the table, even if the router can authenticate using 802.1X. And of course it doesn’t authenticate. The standard method to do 802.1X authentication is with
wpa_supplicationtool, which timed out for me. The tool has no debugging capability that can help me understanding why. So I gave up. -
DD-WRT: the most popular alternative to OpenWRT, which claimed to have Wifi support for my router model. However, I never got further than logging in via SSH. Even though
wpa_supplicantwas there and owned byroot, there were always errors, either “permission denied”, or “command not found”. I even went through the process of compiling new kernel to install the latest version ofwpa_supplication,but to no avail. There was not enough documentation online to help me through it. With other work commitments coming up, I literally shoved the whole thing to the cabinet, cursing it while doing so.
Then Came The Light
Epiphany came in the form of little Raspberry Pi. It was the combination of two observations:
-
The problem with OpenWRT is that it cannot authenticate through 802.1X. My desktop, running Ubuntu, can. The difference is the OS: one is minimal, other is the full-fledge Ubuntu.
-
A Raspberry Pi is:
- Cheap
- Can run full-fledge Ubuntu
- Has LAN ports.
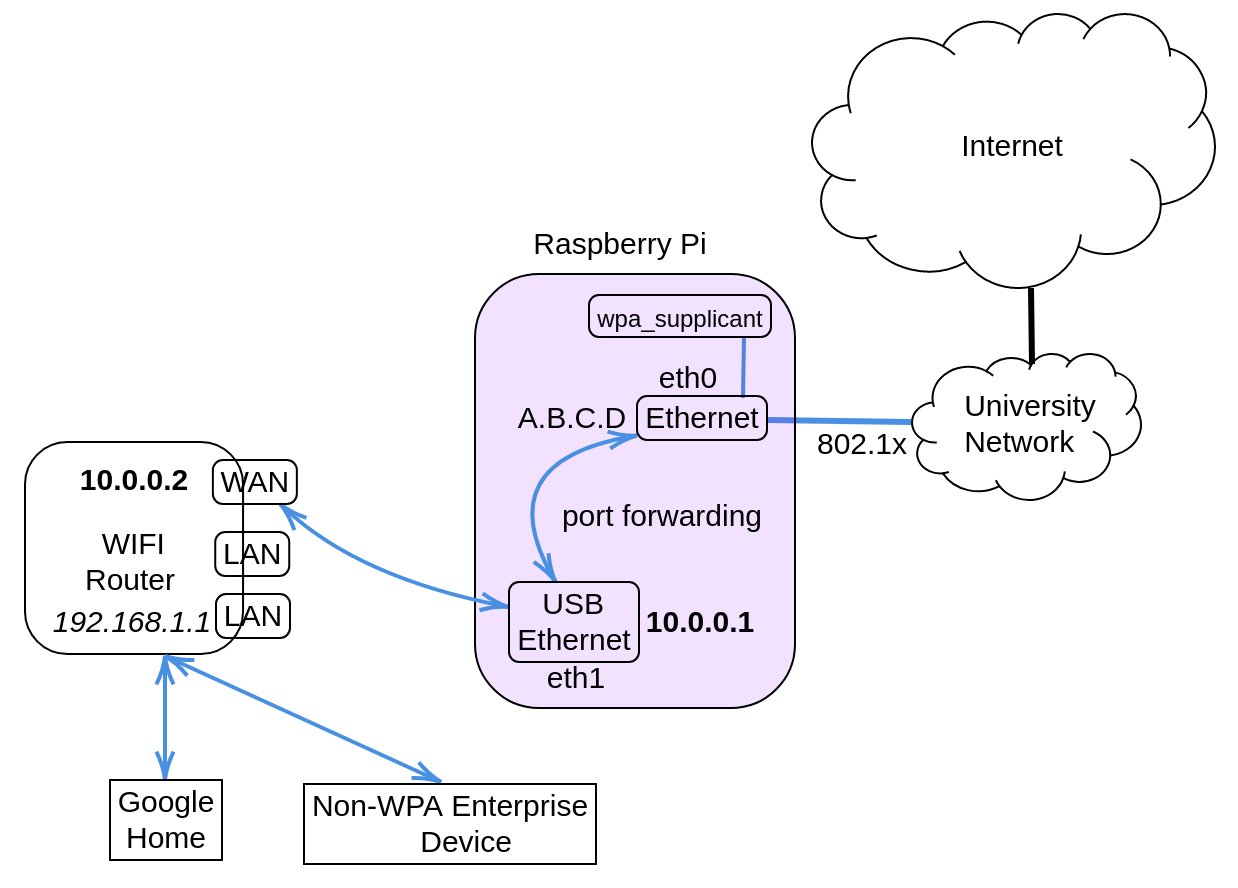
A possible setup is shown in the figure above. The Raspberry Pi will be a gateway that connects to the Internet. There will another LAN port in the device, which is connected to the WAN port of the router. This setup resembles that of a private cluster where the head node typically has 2 LAN ports, one connecting to Internet, another to a switch to which other slave nodes are connected. The head node is then configured so that traffic coming from the cluster will be NAT-ed through the Internet-connecting LAN port.
Detailed Steps
Here are the steps that finally work.
-
Go buy a USB-LAN port, so that the Raspberry Pi has two Ethernet connections: eth0 (built-in), and eth1.
-
Install latest Raspbian OS on it, using the version that include all libraries. I used
Buster with desktop and recommended software. -
Configure
eth1to be a gateway on10.0.0.0/8network:- Edit
/etc/network/interfaceswith the following:auto eth1 iface eth1 inet static address 10.0.0.1 netmask 255.0.0.0 - Edit
/etc/resolv.confto include the default DNS:nameserver 8.8.8.8
- Edit
- Configure port forwarding between
eth0andeth1:- Edit
/etc/sysctl.confnet.ipv4.ip_forward = 1 - Add the following to
/etc/rc.local(before exit 0):iptables -A FORWARD -i eth1 -o eth0 -j ACCEPT iptables -A FORWARD -i eth0 -o eth1 -m state --state RELATED,ESTABLISHED -j ACCEPT iptables -t nat -A POSTROUTING -o eth0 -j MASQUERADEAfter this, all connection from
eth1to the outside world will be NAT-ed througheth0.
- Edit
- Get
eth0to authenticate:- Edit
/etc/config/wpa.conf:ctrl_interface=/var/run/wpa_supplicant ctrl_interface_group=root ap_scan=0 network={ key_mgmt=IEEE8021X eap=MSCHAPV2 eapol_flags=0 identity="<usename>" password="<password>" phase1="peaplabel=1" phase2="auth=MSCHAPV2" } - Then add the following to
/etc/rc.local:wpa_supplicant -D wired -i eth0 -c /etc/config/wpa.conf &You can try out the command first, the log of which should say that authentication is successful.
- Edit
-
Configure WAN port on the router: simply log in to the router at
192.168.1.1and set up static WAN address:- Its IP belongs to the
10.0.0.0/8network. - The gateway is
eth1at the Raspberry Pi, i.e.,10.0.0.1 - DNS is the default
8.8.8.8
- Its IP belongs to the
Epilogue
Me: OK Google. Good afternoon!
GH: Hi, Anh. I see that you have a new greeting routine.
Me: …
No how you doing, no long time no see, no I miss you. What a heartless piece of …!